Tuesday, April 23, 2013

Can You Name A 100% Natural, Healthy, Delicious, Guilt-Free Sweetener?

A University of Rhode Island researcher has recently discovered there are more than 20 different compounds in maple syrup that are linked to human health, 5 of which have never been seen in nature, most of which have only been discovered in the last 2-3 years. These newly identified antioxidant compounds i>>n maple syrup are reported to have anti-cancer, anti-diabetic, anti-inflammatory and anti-bacterial properties. (Science Daily, Mar, 30, 2011)
  
Is there anyone else shocked to find that something as sweet, sticky and wonderful tasting as pure maple syrup could actually be good for you?!

Okay, so even if you didn't go out and tap the maple trees in your yard as suggested in You Can Make Maple Syrup (Seriously...It's Easy!) or follow the step-by-step instructions on how to boil it down in Let's Make Syrup (part 2) (which by the way, you still can, because with this crazy, wintry, so-called spring we're having, the maple sap is still flowing like crazy!), you can still make the decision to buy pure maple syrup and start incorporating it into your diet anywhere you would normally add a sweetener.
Maple Syrup Latte

 This morning I added it to my coffee with some half-and-half (Mmmmm...), last night I made fresh-squeezed lemonade, replacing the sugar with maple syrup (fabulous...and I didn't have to deal with trying to get the sugar to dissolve!), and I've read you can replace it in baking for the sugar (use 3/4 cup maple syrup for every 1 cup of sugar called for in a recipe, then reduce the liquid content by 3 T).


Whatever you do, don't mistake that pancake syrup stuff for pure maple syrup. Take a look at the following side-by-side comparison:


So can you think of any other creative ways to use maple syrup instead of sugar? I saw some recipes for salad dressings, marinades, sweet potatoes, squash, carrots. Opt for maple syrup instead of refined sugar or artificial sugar substitutes in coffee, tea or maybe on your grapefruit. Now I'm not saying to go crazy and declare a Maple Sugar Diet frenzy, because after all, it is still high in sugar, but just consider using it in places where you would normally use sugar.

Unfortunately, pure maple syrup is expensive. I noticed in the store a 12oz. bottle was $9.47!...but if you tap your own maple trees you can make it yourself for free (except for the cost of the $2.99 tapper, which is cheaper than sugar). Already this year we've gotten more than 2 gallons, so you can bet we're going to be finding some mighty creative ways to add this sweet, delicious, healthy syrup into our diets!

And Don't Forget...

High quality food is as important to me as high quality natural skincare products. SkinKissed Naturals products will give you beautiful skin, that feels good, that you can feel good about.

Click this link to take a peek at: SkinKissed Naturals natural skincare products.

Tuesday, April 16, 2013

Let's Make Syrup! - (part 2)

If you haven't read You Can Make Maple Syrup (Seriously...It's Easy!) then you might want to do that first, because today we're covering how to boil the sap down to syrup (part 2).

As a little recap, first you find and identify your maple tree(s). Here's a link to a UofM article to help identify maples for making syrup. And another resource I found shows a few silhouettes of different trees with additional links, and one more simple resource has good pictures of the bark and twigs of sugar maples.  Hopefully, this helps to identify your trees (it is tougher to figure it out in winter).
maple tree seed pods
Maple seed pods
green maple leaf picture
Distinctive maple leaf shape

You'll have to try to remember from last fall, but their leaves are very distinctive looking. Typically, they are the first ones to turn colors in the fall and can be brilliant shades of orange and red (our tree just turns yellow).  They are also the ones that produce those little "helicopter" or "whirlybird" seed pods in the spring/summer.

clear sap in collection bucket
Looking down into collection bucket
sap dripping from tap
Maple sap looks like water
Also, be aware, the sap has the same look and consistency of water.  And there is barely any sweet flavor to it at all; that's because at this point it is only about 1-3% sugar.  Finished syrup has 66% sugar.

After your collection buckets get full, pour them into a larger storage bucket (we used a 5 gallon plastic bucket).  You can filter it at this time through a fine mesh strainer before pouring into the storage bucket to remove any large pieces of sediment, bark, bugs, etc.  Then you'll need to keep the storage bucket in a cool place until you decide to boil.  We took shelves out of our second refrigerator and kept it in there, but I've read where you can even pack your container in snow to keep it cool, out of the way of the sun.

Properly stored sap will keep up to one week, but then you must boil it down, as it can spoil if kept any longer.  We were able to fill 2 five-gallon buckets ranging between 2-5 days, but we collect from two trees (our super huge tree and our neighbor's tree).  The amount you collect will vary; just plan on boiling it down within a week.

So Let's Do It!
You need to decide the best place to boil the sap down.  And it needs to be a place with good ventilation, because it will produce a tremendous amount of moisture in the air.  Here are some ideas:  Outdoor fireplace,  outdoor fire pit with a grate to set your pot on, an outdoor turkey fryer would work great, an outdoor grill, etc.

Boiling down the sap
Boiling 3 pots to speed the process
Since my husband is an appliance guy, we plugged in an old stove out in his shop and left the doors open.  At one point we forgot to keep the doors open and when we went in to check on it, the humidity was at 70%!

So make sure you have an accurate candy thermometer and start boiling away!  I read one tip to help keep it from boiling over is to rub butter around the rim of the pot.  Then just keep (carefully) adding your sap to the boiling pot.  On our second batch, we decided to run 3 pots at once to speed it up and then added them to one main pot.

As it boils down to a smaller amount, you can transfer the liquid to a smaller pot and bring it in the house to finish it off (you still might want to leave a window open for a little ventilation).

The rule of thumb is to boil it until it reaches 7 degrees hotter than when it first boiled (boiling point is apparently affected by your altitude, so take note of the temperature it first boils and add 7 degrees).  Here in Wisconsin, water boils at 212 degrees Farenheit, so it will be done when it reaches 219 degrees Farenheit.  And as the temperature starts to rise above 212, you'll need to watch it very closely, because it will get to 219 rather quickly.  

To Filter, Or Not To Filter?
There are 3 options when it comes to filtering (in a simple home setting):
  1. Filter when it is hot
  2. Decant (pouring it off after it settles 24 hours)
  3. Don't filter
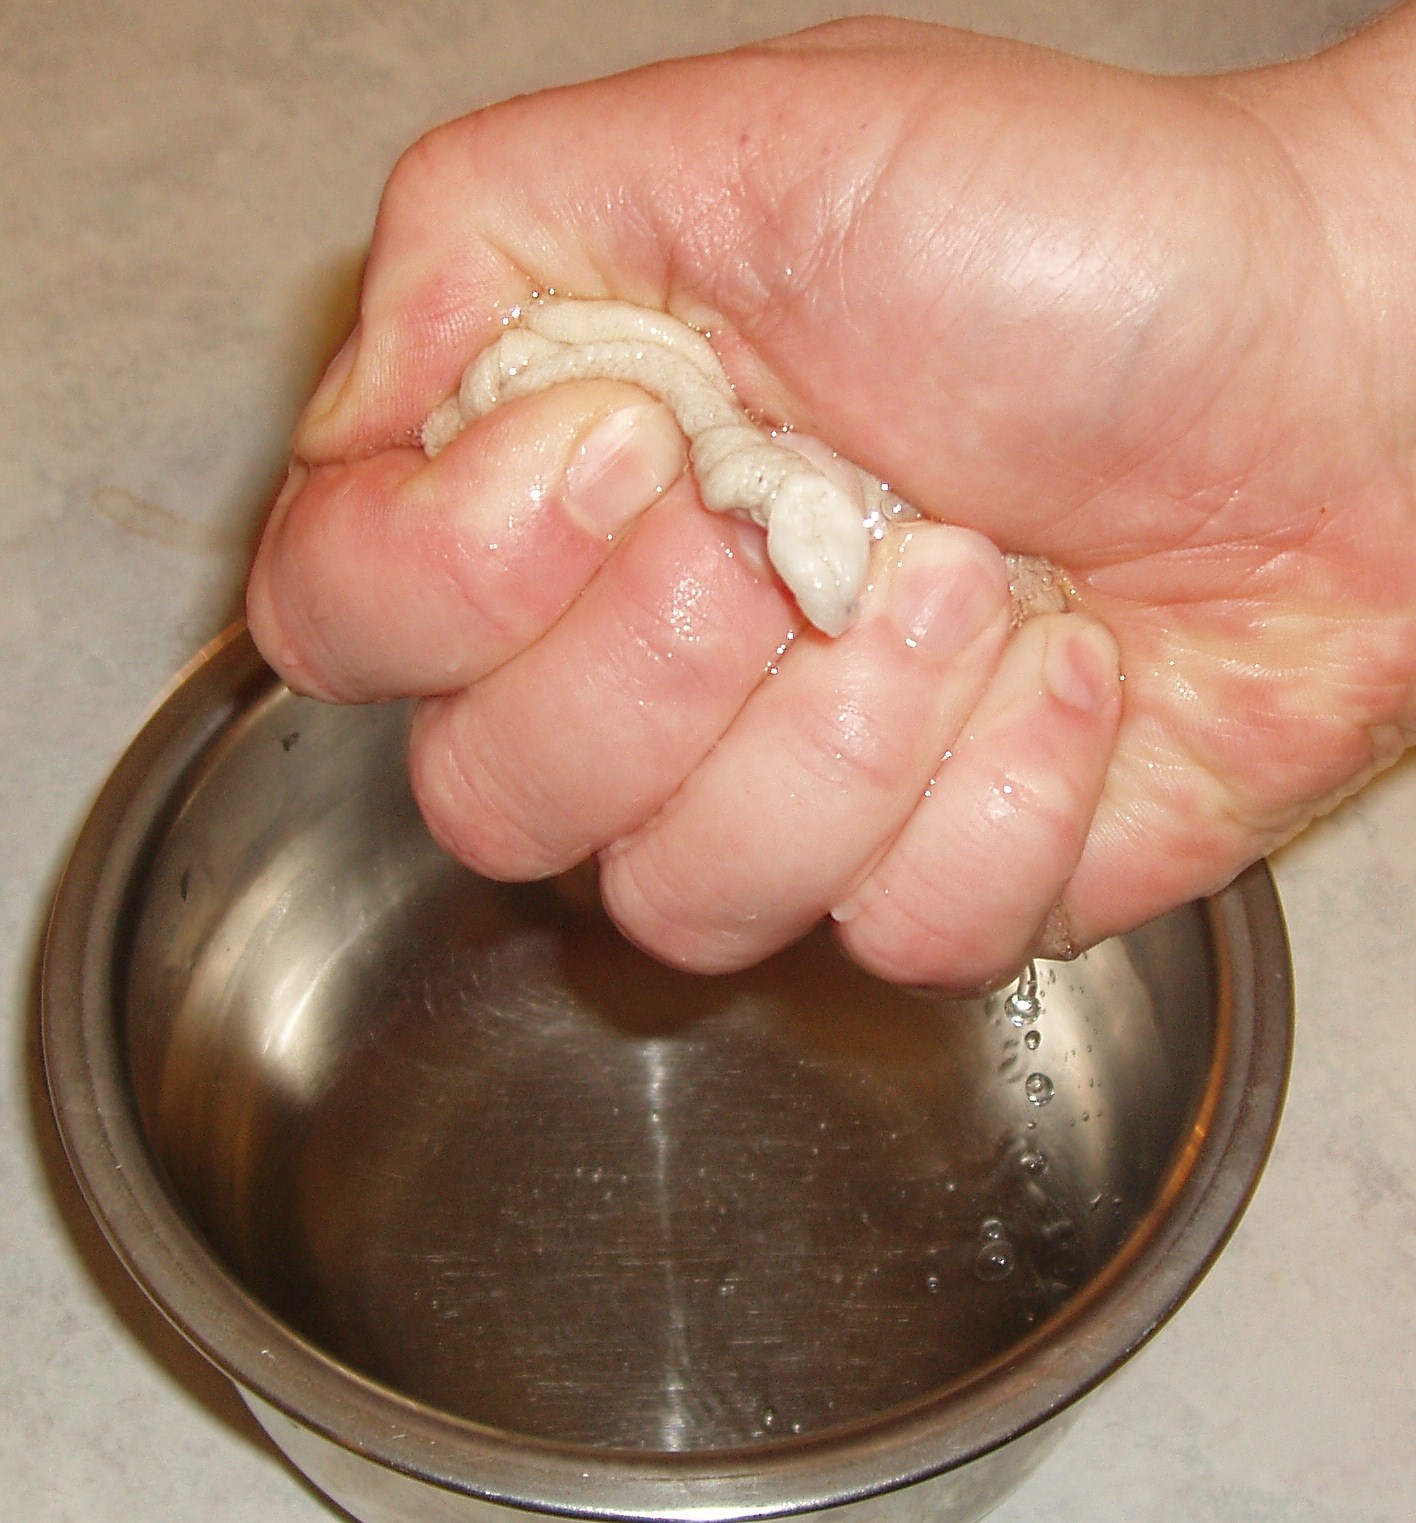
Hot Filter.  What you are filtering is what is called "niter" or sugar sand.  It is a harmless substance made of various minerals and won't hurt you if you consume it, but it doesn't look pretty.  So if you want to filter it, you must do it when it's hot, because once it cools it'll be way too thick!  And even though you may have filtered before you boiled, the niter is extremely fine and you'll need to filter through a very fine substance like flour sack cloth, wool, a few layers of cheesecloth or a special orlon material made for filtering syrup.  You'll want to "prime" or pre-moisten your filter by getting a small amount on it and gently squeezing, otherwise it may just pool and spill over the edge.

Decant.  If you go with the decant method then you don't need to worry about filtering at this point.  You'll just pour the syrup in the jars and let it sit 24 hours.  The niter will settle to the bottom and then you can pour it off into another container, leaving the niter behind in the first container.

Don't Filter.  As I mentioned above, the niter is harmless, it just doesn't look nice.  The choice is up to you.

Syrup Storage
Decanted, finished syrup
What's nice about maple syrup is that you don't have to "can" it in the traditional sense of the word, because the high sugar content in the syrup (66%) helps to self-preserve it.  You can further enhance the preservation of your syrup by keeping it in the refrigerator or freezer (although it's not absolutely necessary).  Take note that the high sugar content will prevent it from freezing solid.

So all you really have to do is make sure you are putting it in clean, dry, food-safe containers, like we did for our first batch pictured at right.

Another option is to seal the syrup in canning jars.  However, you'll need to work quickly, pouring it as soon as possible after you hot filter it, so the temperature doesn't drop too much.  Then you'll need to pop the lids on and gently tip the jars on their side, so the lids stay as hot as possible to help them seal right.

Another variation of this is to first do the decant method.  Then after 24 hours pour (decant) the syrup into a saucepan and heat to 180 degrees, then pour it into canning jars and tilt them on their sides to help them seal.

Are You Going To Try It?
As I'm writing this, we're boiling down our 3rd batch of sap!  We got 2 five gallon buckets filled again in just 2 days...it's crazy!  The sap is still running strong...so it's not too late...I'm telling you, you can start today and have syrup by this weekend!

So how about it?  Is there anyone out there willing to try?  Talk to me in the comments below...or ask me any questions...or post your own pictures on Facebook.

In a couple days I'll conclude this little "series" on maple syrup, comparing its nutritional aspects to regular pancake syrup, and talk about closing up the syruping season.  High quality food is as important to me as high quality natural skincare products.  And with SkinKissed Naturals products you get beautiful skin, that feels good, that you will feel good aboutClick this link to take a peek at SkinKissed Naturals natural skincare products.


Sunday, April 14, 2013

You Can Make Maple Syrup (Seriously...It's Easy!)

If you can answer "yes" to these 3 questions, then you too, can make your own pure maple syrup:
  1. Do you have a maple tree in your yard?
  2. Do you love pure maple syrup?
  3. Do you love saving money?
All you need is ONE maple tree!  In fact, if you get going today, you could have syrup in as little as 2 days...seriously!  If you don't have a maple tree, maybe a friend or neighbor does, so you could make this a joint venture.

And don't worry about what kind of maple you have or how much sap it takes to get what yield, because I discovered ANY maple tree will work!  And while Sugar Maples are preferred by maple syrup producers for the greatest yield, don't let that stop you, because we don't have a Sugar Maple (I think ours is a Soft Maple) and in just 2 weeks we have 1.5 gallons of syrup!

I know my blogs are usually about natural skincare topics (I make and sell SkinKissed Naturals - natural skincare products), but I care about healthy, natural food just as much as I care about natural skincare products!  And since the sap is flowing like crazy right now where we live (in Somerset, WI), if you have maple trees in your yard and this sounds like something you'd like to try, then let's get to it and make some maple syrup!  Besides, what else is there to do in crazy April weather like this?

Today we'll cover finding the right tree(s) and getting them tapped.  Then tomorrow we'll cover the nutritional benefits of maple syrup and how to boil the sap down and store your finished syrup.

What You Need To Get Started... 
Our next door neighbors were originally from out east, where maple syrup is a really big deal, and they gave us their equipment before they moved to Florida.  They convinced me it was easy and I really could do it...and so can you...I'll tell you how!

Here's what you need to get started:
  1. Any maple tree that's at least 10" in diameter
  2. The right temperatures outside
  3. A drill
  4. A tap (also known as a "spile") which our hardware store carries for $2.99 each
  5. A clean, non-rusted, handled bucket or clean gallon milk jug for collecting the sap
  6. 1-2 large storage buckets (like a 5 gallon plastic bucket) to store the sap
  7. One large stainless steel pot to start the boil
  8. One smaller stainless steel pot to finish the syrup
  9. A candy thermometer
  10. Filtering material (optional)
  11. Clean mason jars
That's it!  But don't delay, because the syrup is flowing NOW and you can start today with just the first 5 things listed above!  Then you can worry about gathering the rest of the items needed to complete the job.  So let's break these steps down.

The Right Tree, The Right Conditions
First you need to find a maple tree that is at least 10-12 inches in diameter.  Then you need to make sure the weather/temperature conditions are right.

When the weather is below freezing (32 degrees Farenheit) at night and above freezing during the day, it's time to tap the trees!  These are the conditions that cause the sap in the trees to flow.  In Wisconsin where we live, this is usually some time in March.  We've been at this for a couple weeks already, but the sap is still flowing with this crazy weather we're having (I am so OVER this snow in April thing, but it is good for getting maple syrup!).

The diameter of the tree will determine the number of taps you can use on the tree. According to the Minnesota DNR, here's a general guide:

                                          Diameter of Tree              Number of Taps           
                                           less than 10"                              0
                                           10" to 14"                                   1
                                           15" to 19"                                   2      
                                           20" to 24"                                   3
                                           25" or larger                               4

Now you need to install the taps (or the correct word is "spile").  There are different styles of these, but I saw them at our local hardware store for $2.99 each. 

Drill a hole only the size of the spile (usually 5/16" or 7/16") at a slight angle upward, no more than 2"-3" deep.  Blow the shavings out of the hole, then gently tap the spile with a hammer into the tree, being careful not to split the wood.  Choose a location about 3 feet off the ground, ideally either above a big root or below a big branch, on the south side of the tree where it gets the most sun.

Now all you need to do is hang your bucket!  You should start to see sap running right away if the conditions are right.  It will look like water and has the same consistency.  

You might want to figure out a way to cover the bucket to help keep rain, snow and other debris out (but don't worry if some of that stuff gets in...it's bound to...and you're going to filter it and boil it later anyway).

We got lucky and have one great-grand-daddy of a tree so we installed 3 taps (we didn't have a spile for one so my husband rigged a brass fitting with a refrigerator water tube that drips into the pan on the ground).  Our daughter loves checking the buckets every day!

Now Just Go Do It!
You will be surprised at how quickly your buckets fill.  And when they do, just transfer the sap into a 5 gallon bucket or other container, keeping it in a cool place until you're ready to boil, and keep filling.  Then look for the next post tomorrow or Tuesday to learn how to boil it down and make your syrup!

Now go!  Hurry!  It will be too late when the weather gets warmer, because the sap will stop flowing, we'll have to remove the spiles (then the tree will naturally heal itself), and we'll have to wait until next spring to make syrup again (now go on..go!...You can do it!).

And just like there is no comparison between pure maple syrup and pancake syrup, there is also no comparison between natural skincare products and commercial skincare products. Check out SkinKissed Naturals - healthy, natural skincare products for every skin type at: skinkissednaturals.com.


Monday, January 28, 2013

Soap Nuts - When to Refill?

So you're trying out those soap nuts you just bought and doing back-to-back loads, smiling with satisfaction at seeing your whites looking great, that those stains really are coming out, and now you're smiling extra big and closing your eyes as you take that first whiff after pulling your clothes out of the dryer...Ahhhh...So Fresh...


...And then you give yourself an imaginary pat on the back as you realize you have acheived Total Laundry Awesomeness AND you're protecting your family (and the environment) from unnecessary, harmful chemicals, ALL while saving money too!...WOW!  Now you find yourself holding your chin a little higher thinking, I believe I deserve an award...or at least a Superhero cape...


BUT THEN...you get distracted by the phone, your kids, meals, chores, you know...Life!  And you realize you've lost count of how many loads you've washed with this bag of nuts...OH NO!...

OR

You've happily completed your laundry duties and hung them up to dry until the next laundry go-round.  And here it is, laundry time again, but you realize you've forgotten how many loads you washed with this bag last week...YIKES!...

DON'T WORRY
You DO deserve an award (or at least a cool cape) for making the decision to use soap nuts for your laundry AND you don't need to fret just because you've lost count of how many loads you've done with this wash bag.  BECAUSE luckily, there are 3 quick and easy ways to check if your soap nuts need to be replaced or not:
  1. Feel Them (quick & easy way) 
  2. Look At Them (great way)
  3. Squeeze the Bag After Soaking in Water (best & easy way) 
So let's take a closer look at each one of these.

FEEL THEM 
WET:  Squeeze the bag and check how they feel.  If you're checking them while they are still wet, you'll notice they do soften a bit after every load and that is normal.  But do they feel mushy and considerably thinner or do they feel about the same thickness and still fairly firm?  If they feel mushy and thinner all over with no firm spots left, then it's time to discard them and refill with new ones, but if you can still feel firm spots then they likely have more life left in them.

DRY:  If you're checking them after they've dried out, you'll notice they do harden back up again.  But do they feel noticeably thinner, lighter and more fragile or do they feel about the same thickness and hardness? If they feel thinner, lighter and more fragile then it's time to discard them and refill with new ones, but if they still feel fairly thick and substantial then they are ready to go for more loads.

LOOK AT THEM
If you're still not sure, you can open the bag and take a look at them.  Do you notice any lighter tan/gray color around the edges of the individual nuts?  How much of the nut has changed color? If you notice a lighter tan/gray around the edges of the nuts, then they still should have some washing power left, but if you notice the whole soap nut has turned to this lighter tan color then it's likely they've given all they got and it's time to refill.


 Soap Nuts Before First Wash
  • uniform dark color
  • firm, hard, heavy   


Soap Nuts After 6th Wash
  • Thinner, lighter, more fragile, mushy when wet
  • light tan color over all/most of each nut


SQUEEZE BAG AFTER SOAKING
The third way to know for sure whether your soap nuts can do another load or not is to squeeze the wet wash bag and check for suds.  If you just finished a wash load, then grab the bag and hold it under running water to thoroughly saturate it (or soak it briefly in a small bowl), then pull your hand out of the water and squeeze the bag.  Do you see tiny white bubbles coming out around your fingers? Or are the bubbles more clear looking, large and weak, popping right away?  If you see tiny white bubbles forming, then you're good-to-go for another load, but if the bubbles appear clear, larger, weak, fewer in number and popping right away, then it's time to reload with a fresh batch of soap nuts.


Sudsy Bubbles = Good for Another Wash


Weak/No Bubbles = Refill Bag


So there you have it...3 quick and easy ways to tell when it's time to refill your soap nuts wash bag!  Are you ready to try washing with soap nuts yet?
What are your soap nuts stories and experiences?  Is there anything else you need to know about them before you give them a try?  Would you like to know more uses for them?  Would you like to see progressive pictures of what they look like after 6 washes (I have pictures!)?

Tuesday, June 19, 2012

Do Soap Nuts Work on Super Dirty Clothes?

Well, I experimented to find out!  When someone asked me if soap nuts would clean really dirty work clothes (from working in the septic business), I have to admit, I wasn't really sure. My own husband works with appliances/recycling and has a particular talent for getting his clothes especially dirty and smelly.  So I figured if I ever wanted to know, I would just have to experiment and see. 


BEFORE Soap Nuts


Picture of super dirty clothes before soap nuts
Super Dirty Work Clothes

So this picture is very typical of how really dirty my husband's work clothes get. And before I started using soap nuts, here is the procedure I would follow to try and get them clean with regular detergent...


Laundry Procedure With Regular Detergent:


Picture of work clothes after using regular laundry detergent
Work Clothes After Regular Detergent
  1. Pour maximum amount of detergent in the wash compartment and in the pre-wash compartment.
  2. Add bleach to the bleach compartment.
  3. Select:  "Hot" wash, "heavy soil" and "pre-wash".

All this resulted in a 3 hour wash, after which the clothes would come out just "okay", but with permanent stains and sometimes bleach marks too.  I never pre-treated stains and never added fabric softener or dryer sheets.  Considering how seriously dirty they started out, I figured this was as good as it would ever get.

Experiment With Soap Nuts


So I wanted to put soapnuts to the test with really dirty clothes, but I also wanted to make sure I kept my procedure as similar as possible to my laundry procedure with commercial detergent.  Here is what I did:

Picuture of washer cycle settings for soap nuts experiment
  1. Doubled the amount of soap nuts from .5oz. to 1oz.
  2. Added bleach to the bleach compartment.
  3. Pre-soaked wash bag of soap nuts in small bowl of hot water for 3 minutes.
  4. Selected: "Hot" wash, "heavy soil", "pre-soak", "deep clean".

I had just gotten this new washer and it has "pre-soak" instead of "pre-wash" like my old machine and all those selections resulted in a 2 hr. 23 min. wash versus the 3 hour wash with my old machine, but they are both front-loading HE washers.  I did not pre-treat stains and did not add any fabric softener or dryer sheets.  So I think I accomplished my goal of keeping my procedures as similar as possible.  (You can read more on soap nuts laundry instructions here).

AFTER Soap Nuts


Picture of work clothes looking clean after soap nuts
Soap Nuts Really Work!

Wow!  I am impressed, aren't you?  Soap nuts far surpassed my expectations.  Even though I was committed to using soapnuts with my regular laundry (after seeing the results with my daughter's school uniform), I thought I was maybe going to have to continue with my "regular detergent procedure" for my husband's really dirty work clothes, but I was wrong!


CONCLUSION: Soap Nuts DO Work on Really Dirty Clothes


The results of the experiment are clear:  Soap nuts definitely worked as well (in fact, I think even better) than the regular laundry detergent did!  And I don't know about you, but I strive to use as natural, healthy, and good-for-the-environment products as possible, but the bottom line is, they also have to work


So now I know there is no reason to have to continue buying regular laundry detergent just to get my super dirty clothes clean, because soap nuts can get the job done.  Plus soap nuts are also more economical than regular laundry detergent and they're 100% eco-friendly... what more can a person ask for?  


So here's what I've decided to do with my really dirty clothes...I'm going to run 2 different wash bags:

  • One 1oz. bag of soap nuts for my husband's really dirty work clothes

  • One 1/2oz. bag of soap nuts for my regular laundry


Tell me what you think of my experiment with super dirty clothes below!  


(Or you can click here to learn more about soap nuts for laundry)

Tuesday, May 15, 2012

Soapnuts - Before & After Pics

Soapnuts With Laundry Bag
Can you actually wash your clothes with these things?...YES!...with:  

NO DETERGENT
&
NO FABRIC SOFTENER

In fact some of you have gotten some sample laundry bags like the one in the picture.


What Are Soapnuts?

The little muslin bag in the picture above contains about a half ounce of those brown acorn-looking things, called soapnuts. The official name is sapindus mukorossi, the latin root, sapo, meaning 'soap'.  In fact, it is the outer shells that contain high levels of naturally occurring saponins (or "soap") that act as a natural detergent.  The trees that produce the soapnuts originate primarily out of India and Nepal where they have been used for centuries to gently and effectively clean their fine fabrics.  They have also been traditionally used in Ayurvedic medicine as a treatment for eczema and psoriasis.

These soapnuts are 100% natural, certified organic, completely biodegradable, from a renewable and sustainable source, and require no fossil fuels or chemicals to produce!  They are extremely gentle on skin and are a perfect solution for people with sensitive skin, babies and those with chemical sensitivities to regular detergents.

Do you want to see some before and after pictures of my daughter's school uniform shirts?  Check it out...

Soapnuts Before Picture


 Here you can see the prominent tomato sauce stain on the shirt before I washed it with soapnuts
Soapnuts After Picture


And here you can see how awesomely it came out of the laundry after I washed it with soapnuts! 


And the SMELL...it came out of the dryer with the freshest, hung-outside-on-the-line-all-day smell ever...and all without chemical detergent or fabric softener!  It's hard to believe they can come out smelling like so much fresh, sweet nothingness like they do, considering the smell of wet soapnuts is like a milder version of apple cider vinegar (not all that pleasant), but somehow they do!

How Do Soapnuts Work?

The natural saponins in the shell are released when hot/warm water hits them, turning them into a natural surfactant (surface active agent) or detergent that circulates in the water, which breaks down the surface tension in the water, freeing dirt, grime and oils from the clothing and rinsing away in the rinse cycle.

One bag lasts 4-7 washes, depending on the temperature and hardness of your water, after which you just replace them with new ones.  And since they're 100% natural and biodegradable you don't have to worry about them polluting the ground or water.  I do still pre-treat any stains as needed with a stain remover, but then that's it.  Just toss the bag in with the laundry, remove it to air-dry when the cycle is finished and put the clothes in the dryer.  And soapnuts are perfect for HE (High Efficiency) washers that require low sudsing detergents. 

Soapnuts:
  • anti-microbial properties
  • anti-fungal properties
  • hypoallergenic
  • gentle on fabrics; effectively clean, naturally soften
  • multitude of other household uses (counters, floors, sinks, windows, dishwasher, carpets, jewelry, pets, handwashables)
  • environmentally safe
Of course for me, the most exciting feature of all has to do with their potential and promise for use in personal care products.  I've been working on a foaming handsoap and a 2-in-1 cleansing hair conditioner...stay tuned!

Please comment below and tell me what you think of soapnuts.  If you have tried them, we'd love to hear how it went.  Or if you haven't tried them and think they sound like something you would like to try, let me know that too!

Friday, May 11, 2012

Sexy Summer Feet

(Originally Posted Thursday, June 23, 2011)
 
So our feet have been safely under wraps all winter, but here we are in sandals and barefoot season!  Are your feet summer-ready?  Well if you would like to get some at-home tips to prepare them for this foot-baring season or would just like some inexpensive DIY options to help extend the time between professional pedicures, you are in the right place!

Interestingly enough, the very same things we covered in the January newsletter for dry winter feet are the very same things that will help you achieve sexy summer feet!  Basically, this highly effective treatment is done using plain table sugar!  You can read the whole article, Ugh! I Hate My Dry, Disgusting Winter Feet! or you can follow along below where I will reproduce the pertinent information and provide a link so you can see the results of before-and-after pictures using different versions of a simple, at-home sugar scrub.  Just be sure to click the link called "Back to Summer Feet" on the last picture page to bring you back here.


Click to see pictures


RESULTS:
  All the Treatments Worked Very Well, But Differently


  • Pumice Only:  Using a pumice stone (or similar product) on feet softened from a shower or bath does a good job to get rid of the roughest outiside layers.  I had been doing this alone periodically with some improvement, but still wasn't satisfied with these results alone.  However, I see this as an important first step to lay the groundwork for the following treatments. 
  • Sugar/Water Scrub:  The natural alpha hydroxy acids in the sugar made great progress "eating away" the rough, dry skin leaving it feeling very smooth.  The sugar keeps on working even after it's dissolved and rinses clean away.  However, it still showed dryness in the cracks.
  • Sugar/Oil Scrub:  The sugar didn't seem to to "eat away" the rough, dry skin, as much as it manually scrubbed it away, while the olive oil provided lubrication and moisture to help protect my feet while I continued scrubbing, leaving the skin feeling very smooth and nice.
  • Rescue Balm:  The Rescue Balm really seemed to be the cherry on top in this whole process.  It removed all last traces of dryness in the cracks and left it smooth and protected.  It continued to work over the long haul and the best part is that several hours later my foot still looked good!
In summary, any one of these treatments alone, or in combination with 2 or more, made definite improvements in my feet.  However, If you are in need of drastic measures (like me) or you're just looking to give yourself an extra special at-home beauty treatment, doing all 4 is the ticket!

FINISHING TOUCHES
So what would sexy summer feet be, especially after the wonderful DIY treatments above, without topping them off with a great coat of nail polish?  Obviously, you may all have your own favorites, and I am absolutely no expert in this arena, but my personal favorite to date is one I picked up from River Market Coop called No-Miss.  The color was rich, beautiful, glossy, long-lasting, dried pretty quickly, came off easily when I wanted to take it off, and most importantly, it didn't leave my nail yellow, brittle and dry like every other commercial product I've used in the past.

Tell me what you think of this article and let us know how the treatments worked for you.  And please share your own tips for great summer feet!


(Go to skinkissednaturals.com website)